NZ
NZ


How to create an invitation
In order to conduct a remote administration, you need to send an invitation email to your raters. This email contains a link to compete the assessment online.
To create an invitation
- Select the Email Invitation icon for a product. This could be on the Express Launcher page or a product landing page.A list of clients appears.
- Select a client by clicking the checkbox to the left of their name.
- Click Next.
- Review the client information.If there is a mistake, you can correct it on this page. Note that any changes you make will be applied to the client’s information on the My Clients page.
- Click Save. (Note that you need to click Save to proceed, even if you haven’t changed the client information).
- Select the forms you want to use.Although the options will change based on the product you have selected, you will typically be asked to select a Rater Type, a Description, and the language you want the assessment to be in.
- Enter the name of the rater. If you have selected the Self-Report, the rater name will fill in automatically.
- To enter additional raters, click ADD ANOTHER RATER and repeat steps 6 and 7 above.
- When you have entered all of the raters you want, click Next.
- Review your invitation details. To make changes, click BACK. To continue, click GENERATE LINKS.
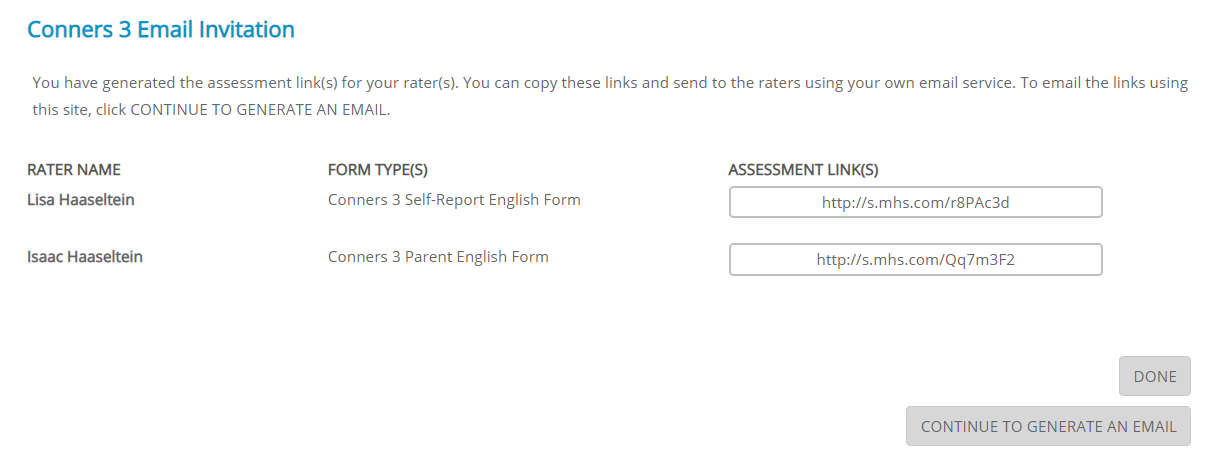
- A page appears with a unique link for each rater. You now have two choices on how to distribute the links:
-
- To use your own email to send the links to the raters, copy and paste the links into emails you create, and then click DONE.
- If you prefer to send the links using the assessment portal, click CONTINUE TO GENERATE AN EMAIL and proceed to step 12 below.
- Add email addresses for all the listed raters. When you’re done, click Next.
- The next page shows the default text of the email that will be sent to raters. Note that the dynamic text within brackets will auto-fill with the name of the rater, the type of form, etc. There is no need to enter this data yourself.If you want to use this default text, click Next and proceed to step 16.
- If you want to create a custom email, make your changes directly to the text. Do NOT alter any of the dynamic text within brackets. If you do, the raters might not receive the link to complete the assessment.
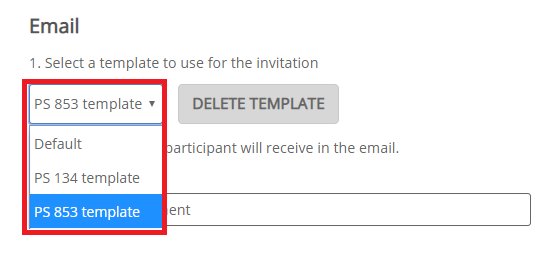
- When you are done changing the text, click SAVE AS NEW TEMPLATE. Enter a name for your template and click Save.Your new template will now be listed in the Template drop-down menu. To use this template again with other raters, select the template name from the Template drop-down menu.
To proceed, click Next.

- Review the outgoing invitations. To make changes, click BACK. To send the invitations, click Send Email.